

This image is generated using Dall-EPrompt: Generate an image of a phone which displays robot arms dragging the UI elements in a minimalistic flat style
In our previous post we’ve learned how to preview our app, so we don’t need to compile and run our application when we want to see what the app looks like. In this post we’ll be taking that a step higher, by creating automated UI tests. This way you don’t have to run and monkey test your UI yourself, but you can let the test runner to the repetitive work for you.
Adding test dependencies
Because we’ve set up Jetpack Compose we need to add the UI test dependency for Jetpack Compose to our test implementation, otherwise we can’t access the UI from our automated tests. Add ui-tests-junit4 and ui-test-manifest dependencies to the app module build.gradle.kts.
1
2
3
4
5
6
7
8
dependencies {
    // ...

    androidTestImplementation("androidx.compose.ui:ui-test-junit4")
    debugImplementation("androidx.compose.ui:ui-test-manifest")

    // ...
}
These dependencies allow us to use the ComposeTestRule and AndroidComposeTestRule which we’ll be needing to set the Compose content (Google, 2024), just like we have inside our MainActivity with the setContent method.
You can even remove the androidx.test.espresso:espresso-core dependency if you want. This is a library that allows you to write UI-tests for the old XML-view UI (Google, 2024). Because we’re using the androidx.compose.ui:ui-test-junit4 library, we don’t need another UI testing library.
Let’s execute a gradle sync, and let’s get started by writing our first UI test.
Create a UI test
Create a new file called MainTests.kt inside the androidTest package in the app module (app/src/androidTests/kotlin/net.bartkessels.myapplication/MainTest.kt) and give it the following contents.
1
2
3
4
5
package net.bartkessels.myapplication

internal class MainTest {

}
Set up the basics
The first thing we’ll need to add is a property which allows us to access the contents of our semantics tree. The compose layout we’ve set up in tne Main composable is transformed into a semantics tree for our UI tests. We can access this tree by referencing an instance of a ComposeRule (Google, 2024).
1
2
3
4
internal class MainTest {
    @get:Rule
    val composeTestRule = createComposeRule()
}
The @get:Rule allows the createComposeTestRule function to run before each test (JUnit developers, n.d.), and set its value to the composeTestRule member.
Create our first test
Now that we’ve set up the basics, we can start by adding a new test which will test if the text for the MainState.Uninitialized equals the expected text of Hello world!.
Create a new method called shouldDisplayHelloWorldWhenTheMainStateIsUninitialized and annotate it with the Test annotation. The Test annotation tells the JUnit test runner that the method on which the annotation is declared, should be run as a test case. To run the test case, JUnit creates a new instance of the class and then calls the annotated method (Junit, 2016).
1
2
3
4
@Test
fun shouldDisplayHelloWorldWhenTheMainStateIsUninitialized() {

}
Inside our first test method we can access our composeTestRule member which gives us access to the compose semantics tree. This is where we can access the elements we specified in our Main composable. For example, to access the Hello world! text we expected to see, we call composeTestRule.onNodeWithText("Hello world!"). This will search the semantics tree for a node with the text Hello world! (Google, 2024).
Before we can verify, or even search for nodes that we expect to be inside our semantics tree, we need to set up the view we want to test. Just like in our MainActivity, we can set the content of our semantics tree with the setContent method. This will set the contents of the composable we declare inside the setContent lambda as the content for the current screen (Google, 2024). Update the shouldDisplayHelloWorldWhenTheMainStateIsUninitialized test case with the setContent call.
1
2
3
4
5
6
@Test
fun shouldDisplayHelloWorldWhenTheMainStateIsUninitialized() {
    composeTestRule.setContent {

    }
}
Inside the setContent we’ll call the Main composable, and this is where you’ll notice that we need to give our MainViewModel as argument. Given the nature of this test, you might only want to test your UI based on the input, thus giving the view model as an argument might be a sign of a bad code design. Because the view model we’ve create before doesn’t have any dependencies, mocking it wouldn’t be hard. But I think that refactoring our UI code might be a better solution than having to mock a view model to test a UI. If we want to validate that our view model does, based on UI interactions, that should be tested separately because we don’t want to mock the complete UI.
Inside the main.kt, refactor the private fun MainInternal to be internal fun MainInternal. This way we can access the MainInternal composable from our test project, but it can’t be access by other application that might include our project as a dependency. Next we’ll update the setUp in our test case to subscribe the situation we’ve written in the name of the test method.
1
2
3
4
5
6
7
8
9
@Test
fun shouldDisplayHelloWorldWhenTheMainStateIsUninitialized() {
    composeTestRule.setContent {
       MainInternal(
           state = MainState.Uninitialized,
           onButtonClick = { }
       )
    }
}
The onButtonClick handler is an empty lambda because we’re not needing the callback when the button is pressed. Because there is no interaction needed to test if the initial state of our text is Hello world!, we can add the call we’ve seen before, to check if the text is displayed, to our test case but this time with an extra call to assertIsDisplayed. This asserts that the Hello world! text node is composed and displayed inside the visible portion of the screen (Google, 2024). This means, that when you have a scroll view and the text might be out of bounds that the assertion will fail. For this, you can use assertExists. This will assert that the node is part of the current compose component tree (Google, 2024). Because our UI only consists of text and a button, we don’t need to worry about any element being out of bounds, and therefore we can safely use the assertIsDisplayed assertion. For larger UI’s I’d recommend using the assertExists assertion as it won’t break when you update the UI where possible elements might fall out of the screen.
1
2
3
4
5
6
7
8
9
10
11
12
13
@Test
fun shouldDisplayHelloWorldWhenTheMainStateIsUninitialized() {
    composeTestRule.setContent {
       MainInternal(
           state = MainState.Uninitialized,
           onButtonClick = { }
       )
    }

    composeTestRule
        .onNodeWithText("Hello world!")
        .assertIsDisplayed()
}
Let’s run the test, and see if it works! When you run this, you’ll probably see a message in Android studio like Waiting for device to come online. This means that Android Studio is starting up an emulator where the test will be executed on. This is because that each UI test is run on an actual device. If you keep looking at your device our the emulator, you’ll see your UI flashing by and the interactions that are automatically processed.
Add multilingual support to the test case
Because of a previous post about multi language support, my device was still set to the Dutch language. Because of this, my test failed as we’ve hard coded the expectation of a Hello world! text node. Let’s refactor the code so we can access the translations we’ve set up inside the string resources.
1
2
3
4
5
6
7
internal class MainTest {
    @get:Rule
    val composeTestRule = createAndroidComposeRule<MainActivity>()
    private val context: Context = InstrumentationRegistry.getInstrumentation().targetContext

    // ...
}
As you see, we access the targetContext of the InstrumentationRegistry. This will allow us to access the targetContext that’s inside the process that our test is running in (Google, 2023). The targetContext gives us access to the context of our target application, i.e. the test code and thus will give us access to the string resources we’ve defined (Google, 2023).
Let’s update our test case to validate that our text is displayed based on the uninitialized_text string resource.
1
2
3
4
5
6
7
8
9
10
11
12
13
@Test
fun shouldDisplayHelloWorldWhenTheMainStateIsUninitialized() {
    composeTestRule.setContent {
       MainInternal(
           state = MainState.Uninitialized,
           onButtonClick = { }
       )
    }

    composeTestRule
        .onNodeWithText(context.getString(R.string.uninitialized_text))
        .assertIsDisplayed()
}
If we run this test again, we’ll see that it passed when your device is in another language that you support. Now you can create a new test to validate that the correct text is displayed for the MainState.Updated state.
Validate a button click
Because we have another component, the button we want to validate that when the button is pressed, the onButtonClick callback is called. Let’s create a new test method called shouldCallOnButtonClickWhenTheButtonIsPressed and set up the content like before.
1
2
3
4
5
6
7
8
9
@Test
fun shouldCallOnButtonClickWhenTheButtonIsPressed() {
    composeTestRule.setContent {
        MainInternal(
            state = MainState.Uninitialized,
            onButtonClick = { }
        )
    }
}
Now we can use the composeTestRule to execute an action on the button node. We can access the button node based on the text.
1
2
composeTestRule
    .onNodeWithText(context.getString(R.string.update_text_button))
On that node, we can call the performClick function. Just like you’d expect, this will perform the click action on the node. Based on the platform this can either be a touch, a mouse click or some other method (Google, 2024). Making our test case look like this.
1
2
3
4
5
6
7
8
9
10
11
12
13
@Test
fun shouldCallOnButtonClickWhenTheButtonIsPressed() {
    composeTestRule.setContent {
        MainInternal(
            state = MainState.Uninitialized,
            onButtonClick = { }
        )
    }

    composeTestRule
        .onNodeWithText(context.getString(R.string.update_text_button))
        .performClick()
}
This will only set up the UI, click our button and nothing else. We need to verify that our onButtonClick callback is called. We can do this by creating a mutable variable called isOnButtonClickCalled and initialize it to false. Inside the onButtonClick lambda, we can update the isOnButtonClickCalled to true, and finally verify that the isOnButtonClickCalled is equal to true.
1
2
3
4
5
6
7
8
9
10
11
12
13
14
15
16
@Test
fun shouldCallOnButtonClickWhenTheButtonIsPressed() {
    var isOnButtonClickCalled = false
    composeTestRule.setContent {
        MainInternal(
            state = MainState.Uninitialized,
            onButtonClick = { isOnButtonClickCalled = true }
        )
    }

    composeTestRule
        .onNodeWithText(context.getString(R.string.update_text_button))
        .performClick()

    Assert.assertTrue(isOnButtonClickCalled)
}
If you run this test, you’ll see nothing happening because there is no UI change when the button is clicked. The text isn’t updated either, because that is based on a MainState change that happens inside the view model. That change will only occur when the onButtonClick callback is called and mapped to the appropriate view model method.
Validate the results
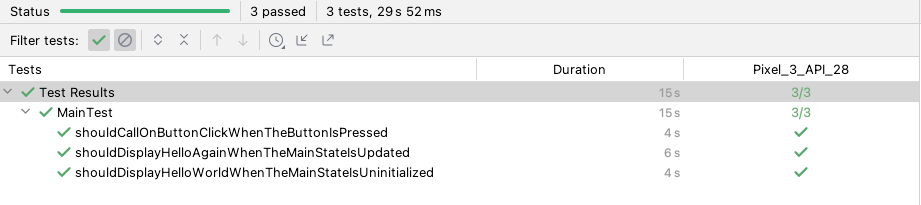
Now that we’ve set up the tests, we can validate that our UI behaves correctly when we pass a MainState and that the button triggers the onButtonClick callback.
- The entire application can be found on github.com/bartkessels/basic-android-app
- Just the code that’s been created in this post can be found in the tutorial/writing-ui-tests branch
Categories
Related articles

Set up Jetpack Compose
In Android development, the new standard for building UI's is Jetpack Compose. But how do you actually set ...

Set up View Models with Jetpack Compose
You've just set up Jetpack Compose, but how do you properly separate the UI from the business logic? This i...
Set up Material Design with Jetpack Compose
You've just set up Jetpack Compose, and now you want to make your app look like a native Android app. This ...

Support multiple languages in your app
The user base for your application includes multiple nationalities, so why don't you update your app to all...