Enable UI preview in Android Studio

This image is generated using Dall-EPrompt: Generate an image of an integrated development environment on a computer screen which displays a phone UI in a flat minimalistic style
In our previous posts about setting up Jetpack Compose and setting up Material Design we’ve been through two UI iterations. To see each iteration, we had to build and run our app. Now, this isn’t that bad for just two iterations and our small UI, but let’s say your working on a big project which consists of multiple components where you’d like to see each component separate from the entire app. This might become pretty tedious when you have to build your entire app just to see how a little component looks.
Luckily for this, we can use previews in Android Studio. This is different from the old XML-views we knew before, because the main difference between the View-based UI and Jetpack Compose is the fact that Compose doesn’t need a View to render it’s composables. Because of this, we can view the UI in Android Studio without having to run the app on an emulator or Android device (Google, 2024).
Add the dependency
For the Android Studio Preview to work, we need to install a dependency androidx.compose.ui:ui-tooling-preview in our app module.
1
2
3
4
5
6
7
8
dependencies {
    // ...

    implementation("androidx.compose.ui:ui-tooling-preview")
    debugImplementation("androidx.compose.ui:ui-tooling")

    // ...
}
This gives us the Preview annotation, which in turn will enable us to preview our UI without having to connect to an emulator in Android Studio (Google, 2024). The debugImplementation will add the extra ui-tooling dependency only when your app is running in debug-mode, in other words, when the preview is being rendered.
Execute a gradle sync and we’re ready to preview our UI.
Create a preview
Our Main composable lives inside the main.kt file, let’s open this file and refactor the Main composable so it isn’t as dependent on the view model as it is now. The reason that this is a problem is that we don’t want to mock or stub our view model in the preview. We only want to display the preview as is, without it doing weird things because of the view model.
We’ll create a new private composable called MainInternal which will have two parameters, on for the onClick handler of the button and one for the MainState.
1
2
3
4
5
6
7
8
9
10
11
12
13
14
15
16
17
@Composable
private fun MainInternal(
    state: MainState,
    onButtonClick: () -> Unit
) {
    val textToDisplay = when (state) {
        MainState.Uninitialized -> R.string.uninitialized_text
        MainState.Updated -> R.string.updated_text
    }

    Column {
        Text(stringResource(textToDisplay))
        Button(onClick = onButtonClick) {
            Text(stringResource(R.string.update_text_button))
        }
    }
}
Now we’ll have to update our Main composable to only call the MainInternal composable with the parameters that we’ll get from our view model.
1
2
3
4
5
6
7
8
9
@Composable
fun Main(
    viewModel: MainViewModel
) {
    MainInternal(
        state = viewModel.displayText.collectAsState().value,
        onButtonClick = viewModel::updateText
    )
}
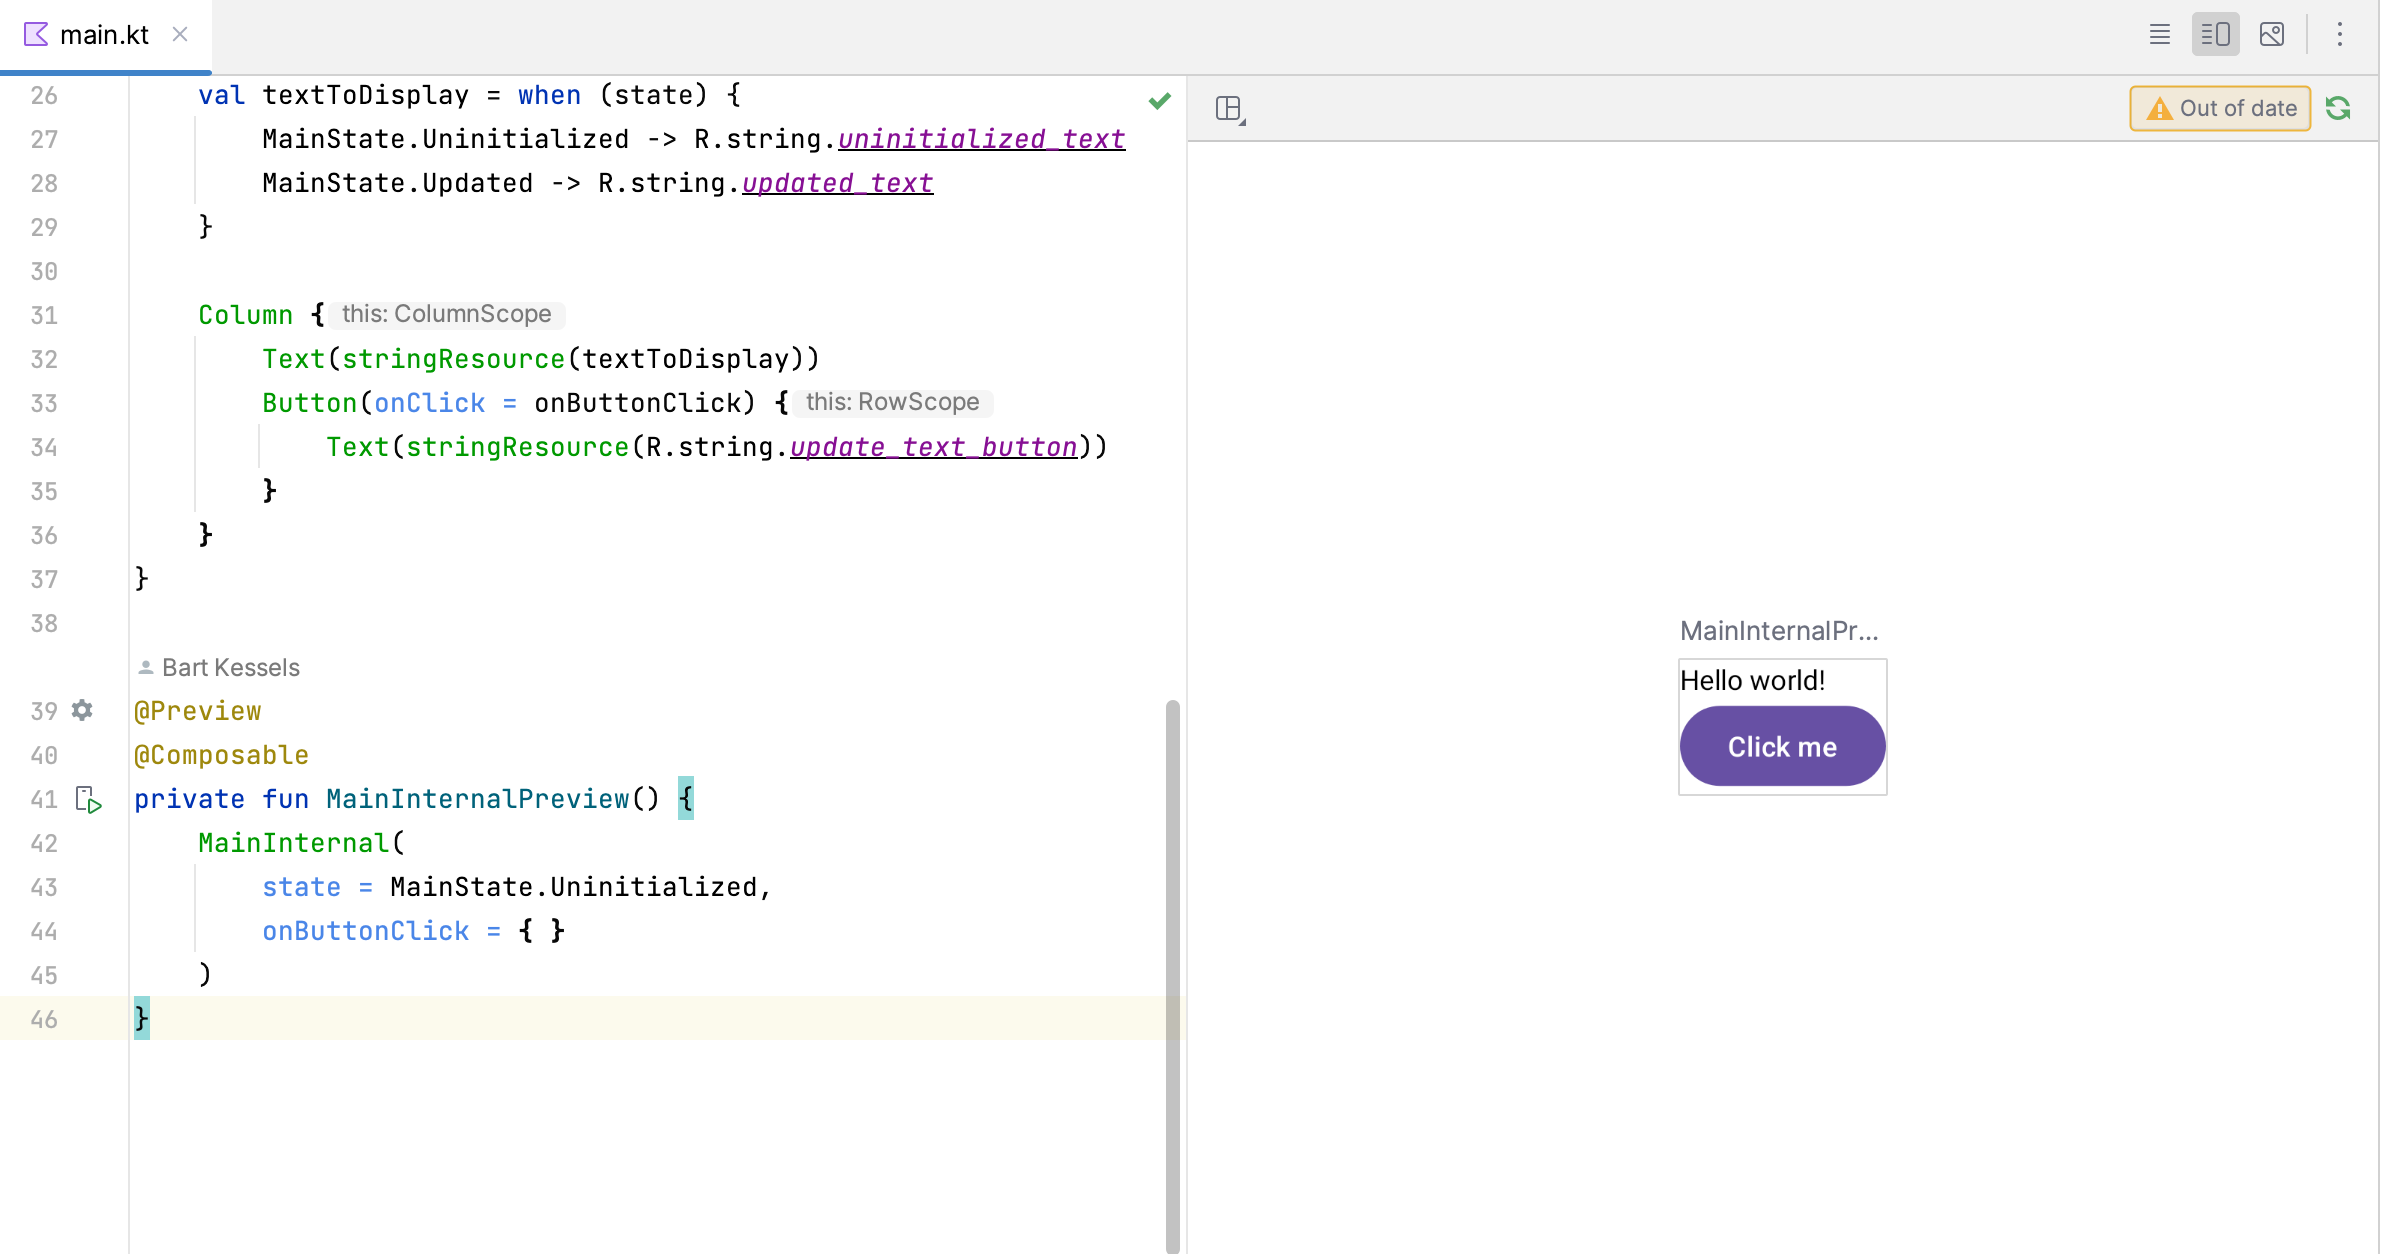
Our app will look and function exactly the same as before, only now we have decoupled the view model from the actual view that we’d like to preview. Let’s create a new private composable as our preview and let it call the MainInternal composable. Much like our Main composable the only difference will be that our preview composable will have the Preview annotation added.
1
2
3
4
5
6
7
8
@Preview
@Composable
private fun MainInternalPreview() {
    MainInternal(
        state = MainState.Uninitialized,
        onButtonClick = { }
    )
}
As you can see, we can give the MainInternal composable the exact values of the state that we want to display. So if we changed the logic of what it should do in case of an Updated state, we can just change the MainState.Uninitialized state parameter to MainState.Updated and our preview would render the MainInternal composable again with the different state.
Our entire main.kt file should look like this.
1
2
3
4
5
6
7
8
9
10
11
12
13
14
15
16
17
18
19
20
21
22
23
24
25
26
27
28
29
30
31
32
33
34
35
36
37
38
// ...

@Composable
fun Main(
    viewModel: MainViewModel
) {
    MainInternal(
        state = viewModel.displayText.collectAsState().value,
        onButtonClick = viewModel::updateText
    )
}

@Composable
private fun MainInternal(
    state: MainState,
    onButtonClick: () -> Unit
) {
    val textToDisplay = when (state) {
        MainState.Uninitialized -> R.string.uninitialized_text
        MainState.Updated -> R.string.updated_text
    }

    Column {
        Text(stringResource(textToDisplay))
        Button(onClick = onButtonClick) {
            Text(stringResource(R.string.update_text_button))
        }
    }
}

@Preview
@Composable
private fun MainInternalPreview() {
    MainInternal(
        state = MainState.Uninitialized,
        onButtonClick = { }
    )
}
Display the preview
If we build the application, Android Studio should display the preview window by default; otherwise you can click on the Code & Preview button in the upper right corner of the file you have open.

- The entire application can be found on github.com/bartkessels/basic-android-app
- Just the code that’s been created in this post can be found in the tutorial/android-studio-preview branch
Categories
Related articles


