Support multiple languages in your app

This image is generated using Dall-EPrompt: Generate an image of a phone which displays multiple country flags in a minimalistic flat style
In our previous post we’ve updated the app to use Material Design. But the text we display is hard-coded in our app. What if our user base consists of English-speaking users and Dutch-speaking users, we’d probably want them to use our app in their native language.
Let’s update our app, so we can support multiple languages. I’ve chosen English and Dutch for this blogpost because I’m a native Dutch-speaker and my English isn’t too bad either. You can obviously use different languages.
Add the default language
When creating a new application through the Android Studio wizard, you automatically get a res/values/strings.xml file. This res/values folder is where all the resources for the default language are stored. If we want to support another language, we simply add a new folder under res with the naming convention of values-b+<country_code> (Google, 2024). This can be done for any resource such as images as well, but for this blogpost we’ll only stick to the strings.
Extract the strings
Right now we have our strings inside our code, let’s remove them from the code and place them in our default language values/string.xml.
1
2
3
4
5
6
<resources>
    <string name="app_name">My Application</string>
    <string name="uninitialized_text">Hello world!</string>
    <string name="updated_text">Hello again!</string>
    <string name="update_text_button">Click me</string>
</resources>
The important part of these strings is the name property. This needs to be the same between all languages because that is what we’ll be referencing inside the UI later.
The app_name string is used for the text that’s displayed under your app icon on the Android home-screen.
Support the Dutch language
Now that we know what strings we need to translate, let’s create a new folder for the Dutch language res/values-b+nl and create a new strings.xml file with the following contents.
1
2
3
4
5
6
<resources>
    <string name="app_name">Mijn Applicatie</string>
    <string name="uninitialized_text">Hallo wereld!</string>
    <string name="updated_text">Nogmaals hallo!</string>
    <string name="update_text_button">Klik mij</string>
</resources>
Right now we’ll leave the strings in the code as they are, because there are a few other changes we’ll be making before we’re going to update the UI.
Update the view model
Because we want to use the text that we’ve defined in the string.xml, we need to extract our Hello world! and Hello again! from our view model. And since we don’t want to rely on the Android libraries in our view model unit tests, we’re not going to use the string resource inside the view model.
What we can do, however, is use states. Our application has two states an Uninitialized state and a Updated state. Where the Uninitialized state corresponds to the Hello world! text, and the Updated state to the Hello again! text.
Let’s create a sealed interface called MainState and add the two Uninitialized and Updated states as implementations. The reason we use a sealed interface as a base for both is that when the implementations of a sealed class are known at compile-time. This allows us to use these states as if they were enum values (Kotlin Foundation, 2023).
1
2
3
4
5
6
// ...
sealed interface MainState {
    data object Uninitialized: MainState
    data object Updated: MainState
}
// ...
Because neither state requires properties we can use them as data object’s. This allows us to use basic operations like equals and toString on the objects because of the data modifier (Kotlin Foundation). And the object type simply tells the compiler that our state is a singleton (Kotlin Foundation, 2023).
Use the states
Now that we’ve declared our states, let’s update the displayText MutableStateFlow to use the MainState instead of a string like we do now.
1
2
3
4
5
// ...

private val _displayText = MutableStateFlow<MainState>(MainState.Uninitialized)

// ...
There is a slight difference as opposed to the string we’ve used before. Now we need to tell the MutableStateFlow what type to use. If we only initialize it with MainState.Uninitialized and don’t set a type, it thinks the type is the Uninitialized implementation of MainState. This will give us errors when we try to update the displayText property with another implementation of the MainState.
Now update the updateText method to remove the Hello again! string and set it to MainState.Updated.
1
2
3
fun updateText() {
    _displayText.update { MainState.Updated }
}
Update the UI
Now that we’ve broken our app, it won’t compile because in the UI it’s trying to pass a MainState argument into a string parameter.
So, let’s first fix that issue by adding a switch statement to determine what string resource should be loaded for each state.
1
2
3
4
val textToDisplay = when (viewModel.displayText.collectAsState().value) {
    MainState.Uninitialized -> R.string.uninitialized_text
    MainState.Updated -> R.string.updated_text
}
This will set the resource id of the expected string resource on the textToDisplay variable. To actually get the string from the resource id, we use the stringResource method inside our Text composable.
1
Text(stringResource(textToDisplay))
And inside our button, we only have one string to display, so we can call the stringResource function with the update_button_text string resource id.
1
2
3
Button(onClick = viewModel::updateText) {
    Text(stringResource(R.string.update_text_button))
}
Changing our entire Main composable to look like this.
1
2
3
4
5
6
7
8
9
10
11
12
13
14
15
16
17
18
// ...

@Composable
fun Main(
    viewModel: MainViewModel
) {
    val textToDisplay = when (viewModel.displayText.collectAsState().value) {
        MainState.Uninitialized -> R.string.uninitialized_text
        MainState.Updated -> R.string.updated_text
    }

    Column {
        Text(stringResource(textToDisplay))
        Button(onClick = viewModel::updateText) {
            Text(stringResource(R.string.update_text_button))
        }
    }
}
Run the app
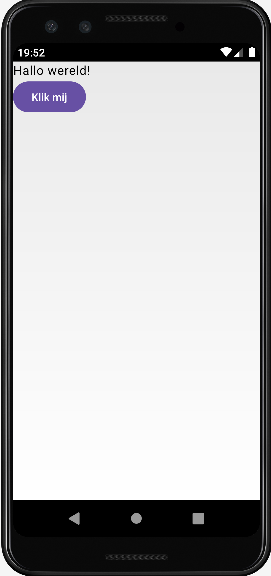
If you run the application, you probably won’t see a change. But if you change your language on the device to Dutch, you’ll see the following. By the way, I wouldn’t recommend changing your phone’s language to Dutch or any other language you don’t understand a little bit. To set your device back to a language you know can be hard when you can’t read the menu items in the settings.
- The entire application can be found on github.com/bartkessels/basic-android-app
- Just the code that’s been created in this post can be found in the tutorial/support-multiple-languages branch
Categories
Related articles

